reading-notes
Course 102, Entry 3: Revisions and the Cloud
Version Control
Through Version Control via a Version Control System (VCS), it is possible to make continuous saves, with each new save checkpoint being a version. This allows for the ability to backtrack changes and pull up code from a previous edit.
Local, Centralized, and Distributed
There are three types of VCSs, Local, Centralized, and Distributed. Local Version Control is saved to one’s local drive. A Centralized Version Control System is a Version Control in which files are saved to a single server. This allows a team of developers to work together on a project, a great facilitator of collaboration. A Distributed Version Control System is like a Centralized Version Control System, except the data on the server is duplicated and distributed to multiple servers. By no longer having all the data in one place, the risk of data loss or server downtime can be eliminated when implemented correctly.
History of Git
The origins story of Git is based in the Linux community. In 2002, Bitkeeper was created under the open-source project, Linux Kernel. However, due to controversy surrounding the company that owned the rights to Bitkeeper, Linus Torvalds, a legendary name in the Linux community, created Git in 2005. Due to its reliability, safe storage processing, and the branching feature, Git quickly rose in popularity.
Git – How it works
Storage
Git’s Versions Control is accomplished via “snapshots”. Snapshots are saves with a reference being logged. The working files are generally worked on a local computer, thus allowing for quick processing as delays from pushing and pulling data are greatly reduced. One of Git’s key benefits is that when a file is commited and pushed to a branch, changes can be tracked. Any time there is a mismatch from what ought to be there, Git will alert the user from which the issue has arisen. By using distributed servers and a solid data preservation structure, the risk of data loss is greatly reduced.
Operation
There are three main states in Git: modified, staged, and committed.
Modified - Change has occurred, yet to be submitted for commit.
Staged – File prepared locally for next commit.
Commit – Data is saved locally, and ready to be pushed to Git.
Getting Started
To get our local repository set, first, initiate Git:
git init
This is your new local repository. Now, stage the file:
git add *.c
git add LICENSE
And run your first commit:
git commit -m "any message here"
Files are now tracking. The above message section holds:
any message here
This can be changed to whatever description the user wishes.
Clone
Cloning is to download a full copy of all versions of every file from a server. Run the following command to clone:
git clone https://github.com/test
Here, change the URL with your server repository URL. To clone to a specific directory, just specify after the URL with a path argument.
For example, git clone https://github.com/test
myproject saves all to the folder, “myproject”.
Repository Structure
Local git repositories are structured in the following way:
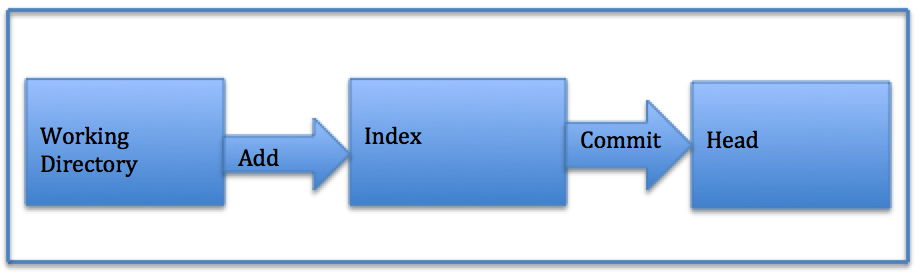
Working Directory - Where files reside locally for edits. Files here are considered “checked out”.
Index - The staging area. Where files reside in preparation for a commit.
Head - Marker for the most recent commit.
Tracked vs Untracked
Files that were part of the most recent snapshot are considered “tracked”. Untracked files, conversely, were not part of the most recent snapshot.
Working File Cycle
Working Commands
Staging
To add a file to be staged, enter the following command:
git add filename
Here the file name is “filename”. Change accordingly.
To add all files in a repository:
git add *
To check the status:
git status
Assuming all is normal a readout similar to the following should appear:
On branch master
Changes to be committed:
(use “git reset HEAD …” to unstage)
Committing
To create a snapshot to the local directory, and prepare it for pushing, the commit command is used.
To commit a file:
git commit -m “made change x,y,z”
Here, the message
made change x,y,z
is set to describe the change. Change the message accordingly.
To commit all modified files:
git commit -A
Pushing
To send files to a remote repository, such as GitHub, the push command can be used. With files having now been committed, they can now be pushed to a remote repository:
`git push origin master’
Here, “origin” is the name of the remote repository, and “master” is the local repository name. Whenever cloning, the remote repository and local repositories are named automatically as aforementioned.
Anything pushed is now part of a snapshot, and thus, tracked.
Stashing
As a “side-edit” option, stashing takes any changes and moves them away from the working directory. The user can then later add them back in.
To stash:
git stash
To apply stashed edits:
git stash apply
Viewing Remotes
To view the short names of any remote repositories:
git remote
To additionally see the corresponding URLs:
git remote -v
Example output:
remote1 https://github.com/remote1/example (fetch)
remote1 https://github.com/remote1/example (push)
remote2 https://github.com/remote2/example (fetch)
remote2 https://github.com/remote2/example (push)
remote3 https://github.com/remote3/example (fetch)
remote3 https://github.com/remote3/example (push)
Thoughts and Observations
After a little testing with Git, it is clear that setting up the correct structures is imperative. Repositories and Pages need to be set in a way that makes sense. With proper structure, it becomes much easier to make commits. Prevention via organization. Without the proper structure, one is likely to run into conflicts.